Creating Course Schedules
Updated: Feb 08, 2018
This is a step by step instructions for creating course schedules.
Create Course
For the purposes of this instructional, I'm going to assuming you've already created the course you would like to schedule.
Find that course by navigating to: Dashboard > Courses > All Courses. Find the course you are wanting to schedule for (note: it may be under the Pending Approval or Unpublished tabs), click edit.
Explanation of concepts
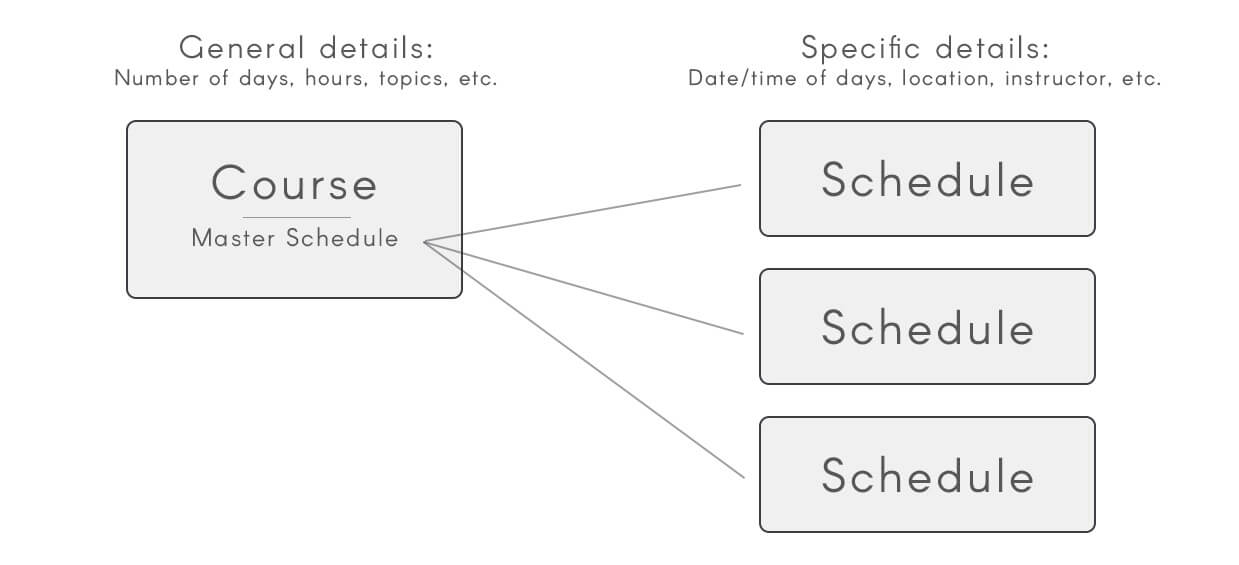
There are two parts to every schedule; the actual course and the schedule the assigns it to a date.
A course has built into it what we call the Master Schedule. Which is like a template for the general details of the course schedule. This includes how many days are in the course, what the topics are, etc. We use these details when creating the schedule instance, which applies the specific details, this includes the actual date and time, the order of days, location of course, etc.
Configure Master Schedule
Before you create any course schedule instances, you need to configure the Master Schedule.
NOTE: If your course is only one day long and doesn't need to display the specific topics, you may be able to skip this step.
From the edit course page, select the tab Master Schedule.
You will see a section called Schedule Break Down. Click Add Day. In the day-block, click Add Topic, configure the hours and subject for the topic, ("Credit Hours" is to signify that the time spent on this topic is to count towards the overall course credit. Example: You may need a 1-hour lunch break on the schedule but don't want to record that time as credit towards the course).
You may add as many days/topics as needed. Click save when complete.
Create Schedule Instance
NOTE: The course must be published and approved before creating Schedule Instance
After you have configured your master schedule, you can now begin to schedule this course!
Navigate to: Dashboard > Courses > Schedules. From this page click New Schedule.
Select which course you are scheduling, then click Next.
There are several options to configure on the next page:
- Select stating date and time
- Select classroom and instructor
- (optional) Select enrollment cut off. This is how many days before the start-date the course enrolment will close
- Enrollment Quotas. This is the student capacity for the course. Select which type of student the course has compacity for.
When these details are configured click Create Course Schedule.
Advanced Settings
If your master schedule includes multiple days you will need to do one additional step.
From the Course Schedule edit page, click the Advanced Settings tab at the top of the page.
You will see a calendar as well as a list of days. You may schedule these days by dragging and dropping them into the correct day on the calendar.
Auto Assign
If the course has many days, it may be useful to use the Auto Assign feature. In the top right of the screen click Auto Assign, this will show a dialogue to select the pattern to automate the days to. (Example: if you have a course with 24 days that need to meet every Friday and Saturday, you may simply select Friday and Saturday from the auto assign dialogue to have the days automatically dispersed to every Friday and Saturday starting from the course schedule start-date.)
Restore From Master
If you change the master schedule after creating the schedule instance, these changes will not be reflected in the schedule instance. On one hand, this is why it is important to correctly configure the master schedule before creating schedule instances. But inevitably changes do happen. If you have updates in your master schedule that you need to be reflected in your schedule instance you may select Restore From Master in the Auto Assign dialogue.